
Workshop 4
2D Games with Dynamic Platforms
Workshop Overview
- Sprite Shapes
- Moving Platforms & Moving Cameras
- Edge Colliders
- Surface Effector
- Player Rotation and Rotation Speed
- Using Invoke() for Delays
- Physics
- Timers
- Activating Powerups
- Anchors & Pivots
- Coroutines
- Events
Game Mechanics
- Player moving along track
- Rotate forwards and backwards (flips)
- Ability to speed up
- Particle events for touching the ground
- Crash detection system that restarts the level
- Finish line that restarts the level
- Scoring system to gain score when flipping
- Powerups the player can pick up
- Character selection screen
Game Design Requirements
Part 1
Follow-Along Parameters Step 1
Create a new 2D Unity project called Snowboarder
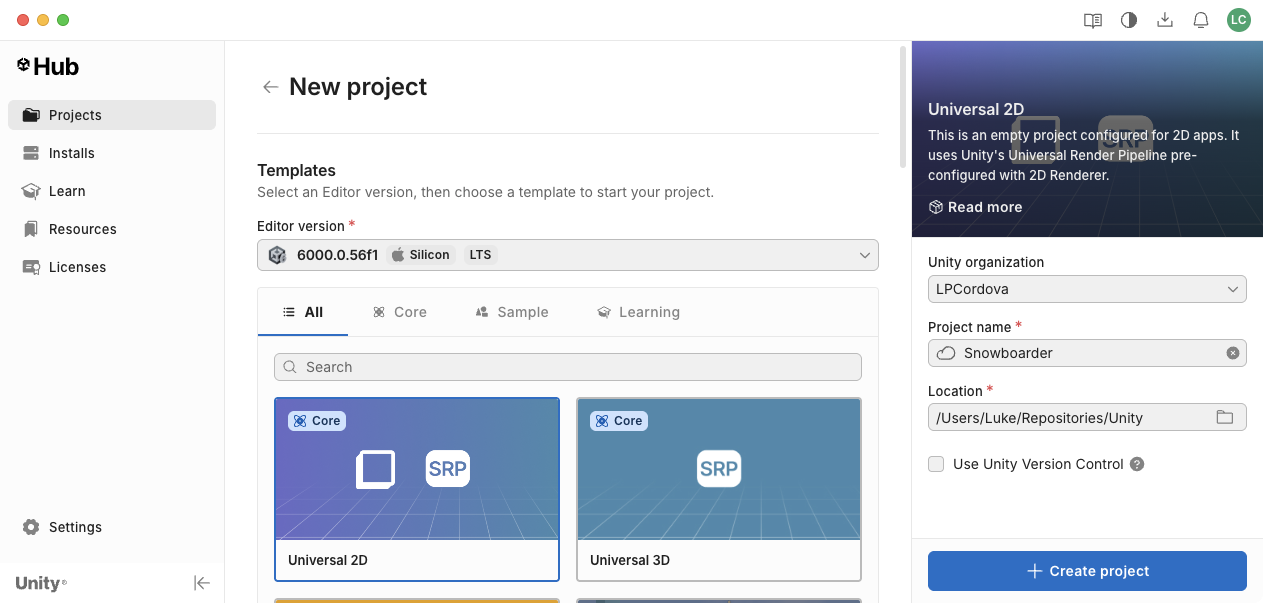
New Project Dialog
Follow-Along Parameters Step 2
Set the Game display to 16:9 in the Display section of the Player Settings.

Player Settings
Follow-Along Parameters Step 3
Create a new folder in the Project window under Assets called Snow and import the images from the ZIP located in Canvas.

Copy Assets
Follow-Along Parameters Step 4
Select and configure both the Floor Tile Fill and Floor Tile assets that you added to a Full Rect mesh type and a Repeat wrap mode and click the Apply button.

Configure Assets
Sprite Shapes
Open shapes
![]()
- Open shapes are shapes that are not closed, like a circle or an ellipse.
- Useful for creating objects that can move through each other, like a player or a projectile.
Closed shapes
![]()
- Closed shapes are shapes that are closed, like a square or a rectangle.
- Useful for creating objects that cannot move through each other, like a wall or a platform.
Add a Closed Shape Sprite to the Scene
- Right-click in the hierarchy panel
- Select 2D Object -> Sprite Shape -> Closed Shape
- Rename the Game Object to
Level Sprite Shape

Level Sprite Shape
Sprite Shape Controllers
- Found in the inspector for the sprite shape
- Control things like:
- Shape options based on points called
Splines - Rendering options
- Geometry options
- Shape options based on points called

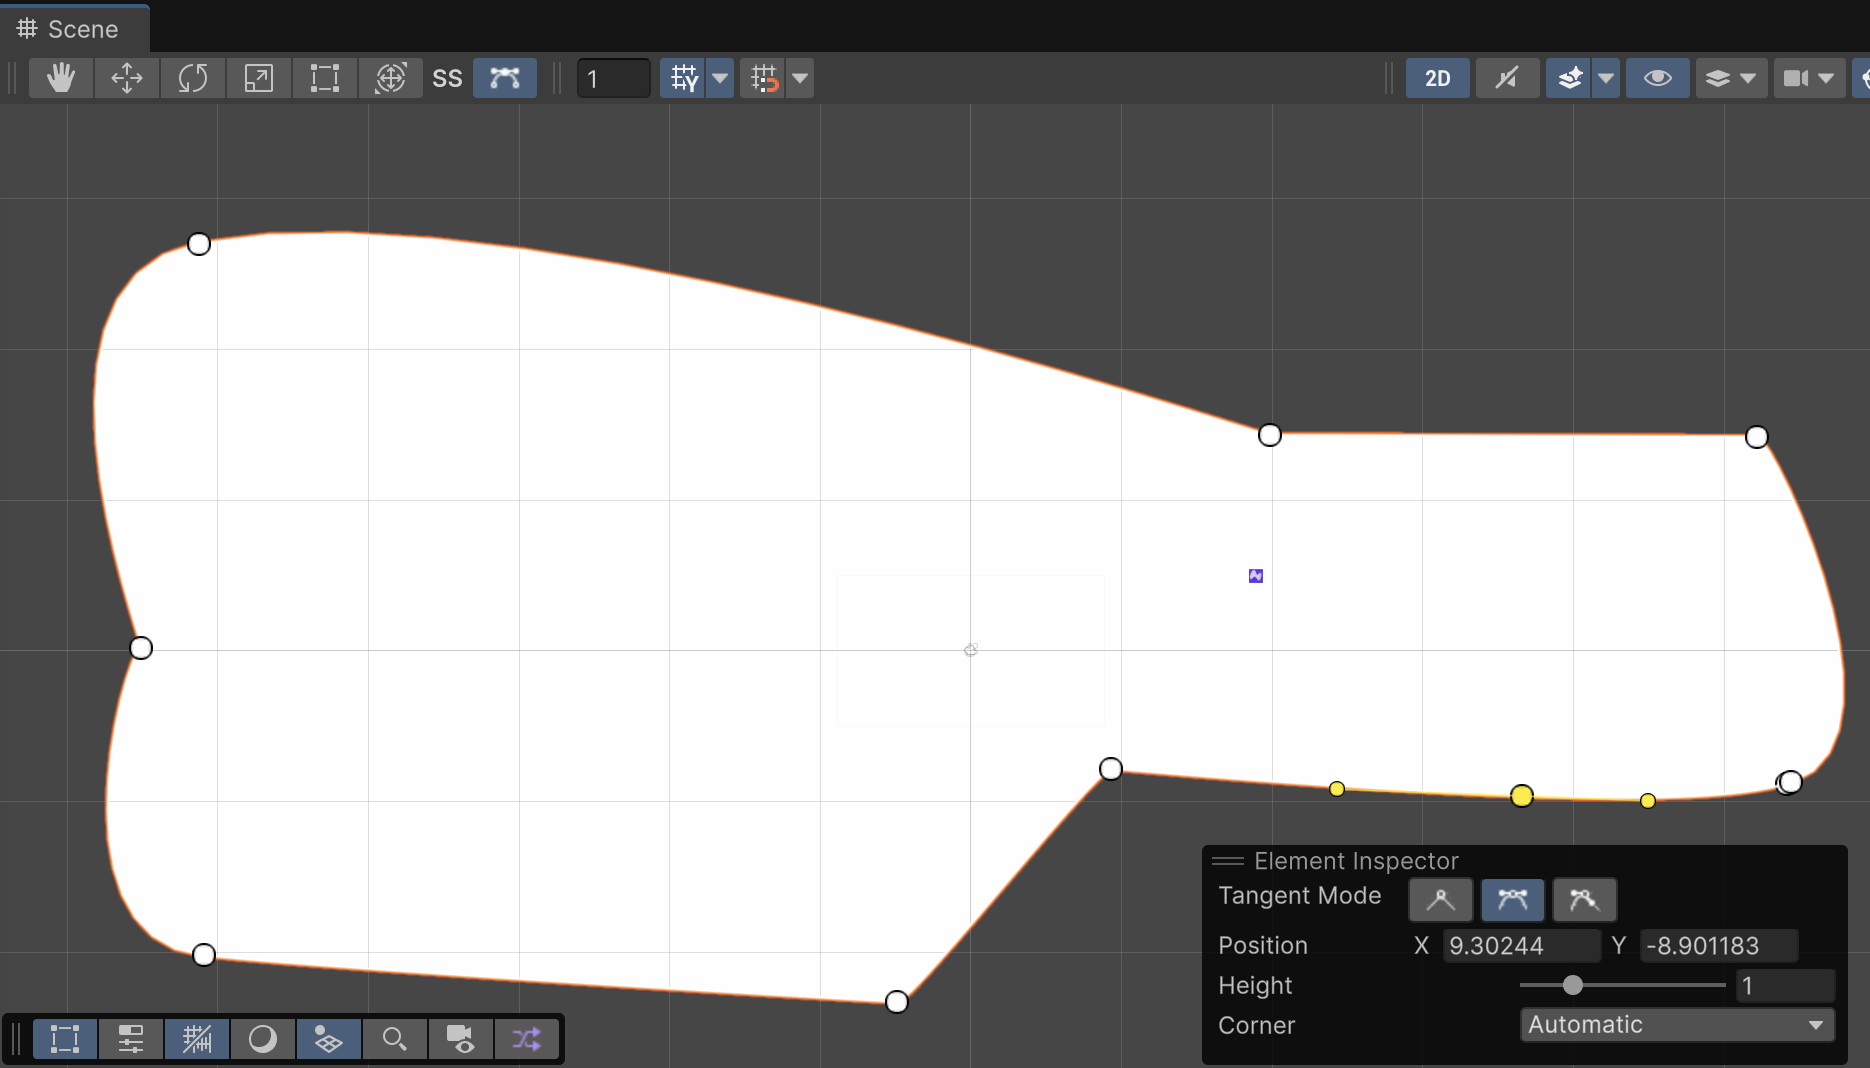
Controlling the Sprite Shape using Splines
- Splines are a series of points that define the shape of the sprite
- We can add points by clicking on the
Splinesbutton

Spline Point Options
- There are three types of points:
- Linear - A straight line between the two points
- Continuous - A smooth curve between the two points
- Broken - A broken line between the two points
Start Designing Your Level
- Start designing your level by adding points to the spline and adjusting/stretching the points to create the shape of your level
Shape Profiles
- Shape profiles are used to determine the shape properties of the sprite
- Specify things like:
- Collision detection
- Rendering
- Repeating textures
- Materials
- Note: The default system shape profile is by default for the level sprite shape
- We will want to create a new one for the level sprite shape. Most times you don’t want to modify the default system shape
Creating a New Shape Profile
Let’s create a new shape profile and use it for our level sprite shape.
- Right-click in the assets folder -> 2D -> Sprite Shape Profile
- Rename the Game Object to
Level Sprite Shape Profile - Select the
Level Sprite Shapein the hiearchy panel - In the inspector, select the Open Shape Profile and select the
Level Sprite Shape Profile
Edge Colliders
- Edge colliders are used to detect collisions with the edges of the sprite.
- Useful for creating objects that can move through each other, like a player or a projectile.
Your Turn
- In the Hierarchy panel, select the Level Sprite Shape
- In the Inspector, click on Add Component -> Edge Collider 2D
Dynamic Sprite Shapes
- Dynamic sprite shapes are sprite shapes that can be changed at runtime.
- They are useful for creating objects that can be changed at runtime, like a player or a projectile.
- They automatically add a Rigidbody2D and a Collider2D component.
Your Turn
- In the Hierarchy panel, right-click -> 2D object -> Physics -> Dynamic Sprite
- Rename the Game Object to “Ball”
Does the ball roll down the slope?
Moving Platforms & Moving Cameras
- Let’s revisit the Cinemachine camera package.
- We will use the Follow Camera to follow the player.
- We can use another camera to Zoom in or out when the player hits a powerup.
Your Turn
Add the package to your project if you don’t have it already.
- Go to Window -> Package Manager -> Cinemachine -> Install.
- Add a Cinemachine camera in the hierarchy.
- Right-click in the hieararchy -> Cinemachine -> Cinemachine Camera
- Set the Tracking Target to the ball and test it.
Your Turn
Let’s add a character to the game to replace the ball. You can use one of the characters from the assets folder or find your own.
- Create a parent object for the Player.
- Add a character asset to the parent object.
- Add a Capsule Collider 2D component to the parent object for the board of the player.
Surface Effector 2D
- Surface Effector 2D is a component that allows you to create a surface that the player can ride on.
- It is useful for creating objects that the player can ride on, like a platform or a ramp.
Your Turn
- Add a Surface Effector 2D component to the parent object.
- Set the Surface Type to Static.
- Set the Use One-Way Collider to True.
Day 1 Recap
- Snow Level Shape (based on a closed shape sprite)
- Used a shape profile to create the shape
- Used splines to create the shape
- Added a floor tile sprite for the shape
- Used a floor tile fill to create the texture
- Edge Collider 2D (so the player can’t fall through)
- Surface Effector 2D (for the player to move on)
- Used a shape profile to create the shape
- Player (based on a character asset)
- Used a Rigidbody2D (for physics)
- Used a Bearcat sprite as an asset for the player
Day 2 Task List
- Input system actions and Vector2s for movement
- Rotation, torque, and angular damping
- Layers and triggers for detecting win/lose
Workshop Day 2 Starting `
If you were not able to finish Day 1 code, you can clone the repository from https://github.com/LucasCordova/Snowboarder
I will take tags for each day we add functionality.
Input System
- The Input System is a new system for handling player input in Unity.
- It is more flexible and performant than the legacy input system, though a bit more complicated.
Input System Actions
- Input System Actions are a way to create a set of actions that can be used to control the player.
- In the Assets folder, you should have a file called
Input Action Asset.asset. - If you don’t have it or you delete it, you can create it by right-clicking in the Assets folder -> Create -> Input Action Asset or go to the Project Settings -> Input System -> Input Action Asset and click the
Create Assetbutton.
Vector2
- Notice that in the
InputSystem_Actionsasset, the Control Type is a Vector2. - Vector2 is a struct that represents a 2D vector.
- It is useful for representing positions, velocities, and other 2D vectors with x and y components.
Your Turn
- In the
InputSystem_Actions, let’s remove all the actions from the Input Action Asset except forMove. - Let’s practice with customizing the
Moveaction in a script.- On your Player object, add a MonoBehaviour script called
PlayerController. - Add an instance variable for an InputAction called
MoveAction. - Find the
Moveaction using the Input System’s FindAction method inStart(). - In
Update(), create aVector2calledmoveActionand set it to the value ofmoveAction.ReadValue<Vector2>(). - Put a debug statement either using Debug.Log(moveAction) or print(moveAction) to verify that
moveActionis working. - What is the value of
moveActionwhen you move the player?
- On your Player object, add a MonoBehaviour script called
Player Controller Script
Rotation
- Rotation will occur around the Z-axis for 2D.
- We don’t want to modify the Z-axis directly, so we will use Torque for rotation.
- If you are using a Rigidbody, you should do rotation using Torque.
- Create an instance variable for the Rigidbody2D called
rigidbody2Dand get the Rigidbody2D. - We’re going to get the Rigidbody2D using the
GetComponent<Rigidbody2D>()method in Start(). - Add a
torqueAmountinstance variable of typefloatand set it to 1f. - In Update(), use the rigidbody2D’s
AddTorque()method to add the torqueAmount to the Rigidbody2D.
Player Controller Script Updates
using UnityEngine;
using UnityEngine.InputSystem;

public class PlayerController : MonoBehaviour
{
    [SerializeField] float torqueAmount = 1f;
    InputAction moveAction;
    Rigidbody2D rigidbody2D;
    void Start()
    {
        moveAction = InputSystem.actions.FindAction("Move");
        rigidbody2D = GetComponent<Rigidbody2D>();
    }

    void Update()
    {
        Vector2 moveVector = moveAction.ReadValue<Vector2>();

        if (moveVector.x > 0f)
        {
            rigidbody2D.AddTorque(-torqueAmount);
        }
        else if (moveVector.x < 0f)
        {
            rigidbody2D.AddTorque(torqueAmount);
        }
    }
}
Angular Damping
- Angular Damping is a property of the Rigidbody2D component that controls the amount of angular drag applied to the Rigidbody2D.
- It’s sort of like friction for rotation.
- It is useful for slowing down the rotation of the Rigidbody2D.
- Let’s set the Angular Damping to 15 to slow down the rotation of the Rigidbody2D.
- Does the player slow down when you stop moving?
Let’s Add a Finish Line
- Let’s add a finish line to the game.
- Use of the flag posts in the Assets folder to the end of the scene and name it
Finish Line. - Add a Box Collider 2D component to it and click the
Is Triggercheckbox. - Let’s set the size of the box collider to Y = 50 to cover the area of the post above the finish line.
- Create a new script called
FinishLineand add it to the Finish Line Game Object. - In the
FinishLinescript, add aOnTriggerEnter2D()method to handle the collision with the finish line with a debug log statement to say “You finished the level!”.
Layers
- Layers are a way to organize your game objects.
- Layers are useful for creating different levels of detail in your game.
- We can create a new layer called
Snow Leveland add the Snow Level Game Object to it. - We can then create a new layer called
Playerand add the Player Game Object to it.
Let’s Use the Layers to Detect Win/Lose
For Win:
- Update the
FinishLinescript to use the layers to detect when the player has finished the level by detecting if the it was thePlayer Levellayer that we collided with. - Create an integer variable called
layerIndexand set it to LayerMask.NameToLayer(“Player”). - In the
OnTriggerEnter2D()method, check if the layerIndex is equal to thePlayer Levellayer and then print out the message.
- Update the
For Lose:
- Add a Circle Collider 2D to the player’s head area.
- Add a new script called
CrashDetectorand add aOnTriggerEnter2D()method to handle the collision with the crash detector with a debug log statement to say “You crashed into something!”. - Test it!
Day 2 Recap
- Input system actions and Vector2s for movement
- Rotation, torque, and angular damping
- Layers and triggers for detecting win/lose
Day 3 Task List
- Namespaces and Scene Management
- Using Invoke() for Delays
- Adding Particle Systems for Finish Line, Crash, and Snow
- Using FindFirstObjectOfType()
- Using OnCollisionExit
- Calculating Number of Flips
Namespaces
- Namespaces are a way to organize your code.
- They are useful for preventing name conflicts between different parts of your code.
Scene Management
- Scene Management is a way to manage your scenes.
- Scenes are managed as part of Build Profiles.
- The ScenesList is an an array of scenes that can be access by index.
- We can use the SceneManager class to load and unload scenes via the
SceneManager.LoadScene()method.
Your Turn
- In the
FinishLineuse the SceneManager to reload the current scene after the player has finished the level.
Reload Scene Code
Adding a Delay with Invoke
- Two useful methods for adding a delay are:
- Invoke
- Coroutines
- Invoke() is a method that allows you to call a method after a delay.
- Invoke() is easier to use, but not as powerful.
- It is useful though for delaying the execution of a method.
- For example: we can use the Invoke() method to reload the current scene after the player has finished the level.
Invoke("NameOfMethod", delayInSeconds)
Limitations of Invoke
- Invoke() is limited to a single method call.
- The method you call must be in the same class as the one calling Invoke().
- It cannot take parameters.
- You should create a wrapper method in the class that is calling Invoke.
Your Turn
- In the
FinishLineuse the Invoke() method to reload the current scene after the player has finished the level. - Instead of using a constant for the delay, use a SeralizedField for the delay.
Invoke() Code
Adding Particle Systems for Snow
- Particle systems will be a great way to add visual polish to the game for snow.
- We can use the particle system in several ways:
- When the player is moving on the snow
- When the player is crashing
- When the player is finishing the level
- When the player is flipping? …
Particle System Settings for Finish Line (tweak as desired)
- Duration: 0.2 seconds
- Loop: unchecked
- Play on Awake: unchecked
- Start Speed: 5 or better:
- Random between 5 and 10
- Start Color:
- Random between two colors: light green and light blue
- Start Lifetime: 0.3 seconds or better:
- Random between 0.2 and 1 second
- Emission
- Rate Over Time: 200
- Shape:
- Shape: Sphere
- Renderer:
- Material:
- Can use a material for the snow or just leave the squares.
- Material:
Controlling Particle Systems Programmatically
- We can control particle systems programmatically by using the ParticleSystem object reference.
- Use the
.Play()method to play the particle system. - Use the
.Stop()method to stop the particle system. - Use the
.Pause()method to pause the particle system. - Use the
.Clear()method to clear the particle system. - Use the
.Emit(int count)method to emit a number of particles. - Use the
.SetBurst()method to set a burst of particles. - Use the
.SetEmissionRate()method to set the emission rate of the particle system.
Detecting When to Start/Stop Particle Systems
- We can detect when to start/stop particle systems by using the
OnTriggerEnter2D()andOnTriggerExit2D()methods. - We can use the
collisionparameter to get the other game object that entered the trigger.
Start Particle System Code
Stop Particle System Code
Particle System Object Reference
- We can get a reference to the particle system by using the
GetComponent<ParticleSystem>()method. - We can also just assign the particle system to a variable in the class and assign it through the Inspector. <– this is what we will do
Your Turn
- Add a particle system to the finish line.
- Add a particle system to the player when they crash their head into the snow.
- Add a particle system to the player while on the snow.
Particle System for While on the Snow
- Create (or copy) a particle system for the snow.
- Create a script called SnowTrail that detects when the player is on the snow.
- When the player is on the snow, start the particle system.
- When the player is not on the snow, stop the particle system.
Snow Trail Script
public class SnowTrail : MonoBehaviour
{
    [SerializeField] ParticleSystem snowParticles;

    void OnCollisionEnter2D(Collision2D collision)
    {
        int layerIndex = LayerMask.NameToLayer("SnowLayer");

        if (collision.gameObject.layer == layerIndex)
        {
            snowParticles.Play();
        }
    }

    void OnCollisionExit2D(Collision2D collision)
    {
        int layerIndex = LayerMask.NameToLayer("SnowLayer");

        if (collision.gameObject.layer == layerIndex)
        {
            snowParticles.Stop();
        }
    }
}
Day 3 Recap
- Namespaces and Scene Management
- Using Invoke() for Delays
- Adding Particle Systems for Finish Line, Crash, and Snow
- Using FindFirstObjectOfType()
Day 4 Task List
- Customizing the speed of the player
- Stop the player from controlling after crashing
- Calculate flips
- Score counter text
- Activating power ups
Customizing the Speed of the Player
- Let’s say we want to increase the speed of the player when they hit the Up Arrow key.
- We’ll need a couple of instance variables to help us out:
baseSpeedboostSpeed
Surface Effector 2D
- Recall that we used the Surface Effector 2D component to create the move effect.
- We will need an object reference to the Surface Effector 2D component in order to change the speed of the player.
- We can get a reference to the Surface Effector 2D component by using the
GetComponent<SurfaceEffector2D>()method. - We can also use FindFirstObjectOfType
() to get a reference to the Surface Effector 2D component. <– this is what we will do
Get Surface Effector 2D Object Reference Code
Slight Refactor of PlayerController
[SerializeField] float baseSpeed = 20f;
[SerializeField] float boostSpeed = 30f;
void Update()
{ // Refactored
  Vector2 moveVector = moveAction.ReadValue<Vector2>();
  RotatePlayer(moveVector);
  BoostPlayer(moveVector);
}
void BoostPlayer(Vector2 moveVector)
{
  if (moveVector.y > 0f) surfaceEffector2D.speed = boostSpeed;
  else surfaceEffector2D.speed = baseSpeed;
}

void RotatePlayer(Vector2 moveVector)
{
  if (moveVector.x > 0f) rigidbody2D.AddTorque(-torqueAmount);
  else if (moveVector.x < 0f) rigidbody2D.AddTorque(torqueAmount);
}
Stop the Player from Controlling after Crashing
- We want the stop the player from controlling after they crash.
- We can do this in PlayerController by adding a new property called
canMove. - We can then use a public method called
DisableControls()to disable the controls.
Where would we call DisableControls() from?
Your Turn
- Add a new property called
canMoveto the PlayerController script. - Add a new public method called
DisableControls()to the PlayerController script. - In the
DisableControls()method, set thecanMoveproperty to false. - In the
Update()method, check if thecanMoveproperty is false and if so, return. - In the
OnCollisionEnter2D()method in the CrashDetection, get the instance of the PlayerController and call theDisableControls()method. - Test it!
Disable Controls Code
// PlayerController
[SerializeField] bool canMove = true;
public void DisableControls() => canMove = false;

public void Update()
{
  if (!canMove) return;
  RotatePlayer();
  BoostPlayer();
  CalculateFlips();
}

// CrashDetection
void OnCollisionEnter2D(Collision2D collision)
{
    PlayerController playerController = FindFirstObjectOfType<PlayerController>();
    playerController.DisableControls();
}
Scoring System Feature
- We need a scoring system to motivate the player.
- We can track how many flips the player has done.
Algorithm for Calculating the Number of Flips
We can use this algorithm:
- Use Mathf.DeltaAngle to calculate the angle change every frame.
- We’ll store the total rotation in a variable.
- Once the player spins 360 degrees, we’ll increment the flip count.
Algorithm Continued
We will need 3 more variables to count flips:
previousRotation: the rotation from the previous frame.totalRotation: the total rotation we get from deltaAngle().flipCount: the number of flips the player has done!
Code for Calculating the Number of Flips
  // PlayerController
  float previousRotation = 0f;
  float totalRotation = 0f;
  int flipCount = 0;

  public void CalculateFlips()
  {
    float currentRotation = transform.rotation.z;
    totalRotation += Mathf.DeltaAngle(previousRotation, currentRotation);
    previousRotation = currentRotation;
    if (totalRotation >= 360f)
    {
      flipCount++;
      totalRotation = 0f;
    }
    Debug.Log($"Flips: {flipCount}");
  }
Score Counter Text
- Use a Canvas to display the score counter text (Right click in the hierarchy panel -> UI -> Canvas).
- Add text: Canvas -> UI -> Text- TextMeshPro.
- Change the Text’s object name to ScoreText.
- You will be prompted to import the TMP Essentials package.
- Add some text to the Text object: like: Score: 0.
- In the Canvas property inspector, set the Canvas Scaler to
Scale with Screen Sizeand set the Reference Resolution to1920x1080.
Score Counter Text Continued
- Change the Font Size to something visible.
- Create a new Script called ScoreManager and attach it to the Canvas game object.
- Create an SerializeField for the scoreText.
- Tie the scoreText to the ScoreText object in the Inspector for the Canvas.
Score Manager Text Continued
- Add a new method called
AddScore(int additionalScore)to the ScoreManager script. - In the
AddScore()method, add the additionalScore to the score and update the scoreText.
Score Manager Text Continued
- In the PlayerController script, get the instance of the ScoreManager and call the
AddScore()method. - In the
CalculateFlips()method, call theAddScore()method with the flipCount.
Day 4 Recap
- Customizing the speed of the player
- Stop the player from controlling after crashing
- Calculate flips
- Score counter text
Day 5 Task
- Scriptable objects
- Enemy stats
- Audio settings
- Level data
What Are Scriptable Objects?
ScriptableObject is a Unity class that allows you to store large amounts of shared data independent from script instances.
Key Benefits:
- Data persistence in the editor
- Shared between scenes
- Memory efficient
- Asset-based workflows
- Reduces dependencies
Common Uses:
- Game configuration
- Item databases
- Enemy stats
- Audio settings
- Level data
Why Use Scriptable Objects?
The Problem
Issues:
- Data duplicated across every Enemy instance
- Hard to manage at scale
- Difficult to balance without recompiling
- No data sharing between instances
The Solution: Data-Driven Design
[CreateAssetMenu(fileName = "EnemyData",
                 menuName = "Game/Enemy Data")]
public class EnemyData : ScriptableObject {
    public float health;
    public float damage;
    public float speed;
    public Sprite sprite;
}

public class Enemy : MonoBehaviour {
    public EnemyData data;

    void Start() {
        // Use data.health, data.damage, etc.
    }
}
Benefits: One asset, many references!
Creating a Scriptable Object
Step 1: Define the Class
Creating a Scriptable Object
Step 2: Create Asset in Unity
- Right-click in Project window
- Select Create → Inventory → Item
- Configure values in Inspector
- Reference asset in your scripts
Using Scriptable Objects
Referencing in Scripts
The same Item asset can be referenced by multiple GameObjects!
Advanced Example: Weapon System
[CreateAssetMenu(menuName = "Weapons/Weapon Config")]
public class WeaponConfig : ScriptableObject {
    [Header("Visual")]
    public GameObject prefab;
    public Sprite uiIcon;

    [Header("Combat Stats")]
    public float damage;
    public float fireRate;
    public int magazineSize;
    public float reloadTime;

    [Header("Audio")]
    public AudioClip fireSound;
    public AudioClip reloadSound;
}
Advanced Example: Weapon Controller
public class WeaponController : MonoBehaviour {
    public WeaponConfig config;
    private float lastFireTime;
    private int currentAmmo;

    void Start() {
        currentAmmo = config.magazineSize;
    }

    public void Fire() {
        if (Time.time - lastFireTime < 1f / config.fireRate)
            return;

        if (currentAmmo > 0) {
            // Deal damage, play sound, etc.
            AudioSource.PlayClipAtPoint(config.fireSound,
                                       transform.position);
            currentAmmo--;
            lastFireTime = Time.time;
        }
    }
}
Common Patterns: Events
ScriptableObject Events
[CreateAssetMenu(menuName = "Events/Game Event")]
public class GameEvent : ScriptableObject {
    private List<GameEventListener> listeners =
        new List<GameEventListener>();

    public void Raise() {
        for (int i = listeners.Count - 1; i >= 0; i--) {
            listeners[i].OnEventRaised();
        }
    }

    public void RegisterListener(GameEventListener listener) {
        listeners.Add(listener);
    }

    public void UnregisterListener(GameEventListener listener) {
        listeners.Remove(listener);
    }
}
Common Patterns: Variables
Shared Variables
[CreateAssetMenu(menuName = "Variables/Float Variable")]
public class FloatVariable : ScriptableObject {
    [SerializeField] private float value;

    public float Value {
        get { return value; }
        set { this.value = value; }
    }

    public void Add(float amount) {
        value += amount;
    }

    public void Set(float amount) {
        value = amount;
    }
}
Multiple systems can read/write to the same value!
Common Patterns: Databases
Item Database
[CreateAssetMenu(menuName = "Database/Item Database")]
public class ItemDatabase : ScriptableObject {
    public List<Item> allItems;

    public Item GetItemByName(string name) {
        return allItems.Find(item =>
            item.itemName == name);
    }

    public List<Item> GetItemsByType(ItemType type) {
        return allItems.FindAll(item =>
            item.type == type);
    }

    public Item GetRandomItem() {
        return allItems[Random.Range(0, allItems.Count)];
    }
}
Best Practices
Do:
- Use for data that doesn’t change during gameplay
- Create focused, single-responsibility assets
- Use
[CreateAssetMenu]for easy creation - Organize assets in clear folder structures
- Use references instead of finding objects
Don’t:
- Store runtime state that needs to persist
- Use for data that needs to be saved per-player
- Modify values at runtime (unless you reset them)
- Confuse with MonoBehaviour scripts
Runtime Modifications
Careful with Runtime Changes!
Solution: Copy values to instance variables
Advanced: Polymorphism
Abstract Base Classes
public abstract class Ability : ScriptableObject {
    public string abilityName;
    public float cooldown;

    public abstract void Activate(GameObject target);
}

[CreateAssetMenu(menuName = "Abilities/Damage")]
public class DamageAbility : Ability {
    public float damage;

    public override void Activate(GameObject target) {
        target.GetComponent<Health>()?.TakeDamage(damage);
    }
}
Advanced: Polymorphism
Using Different Abilities
Different ability types, same interface!
Performance Considerations
Memory Benefits
- Without ScriptableObjects: Each enemy MonoBehaviour stores duplicate data
- 100 enemies × 5 KB = 500 KB
- With ScriptableObjects: Shared reference to one asset
- 100 enemies × 8 bytes (reference) + 5 KB (asset) = 5.8 KB
~86% memory reduction!
Serialization & Persistence
Important Notes:
- ScriptableObjects save automatically in the editor
- Changes persist across play sessions in editor
- In builds, assets are read-only
- For player-specific data, use:
- PlayerPrefs
- JSON serialization
- Save system
- Database
Design Pattern: Strategy Pattern
// Strategy interface
public abstract class AIStrategy : ScriptableObject {
    public abstract Vector3 CalculateMove(GameObject enemy);
}

// Concrete strategies
[CreateAssetMenu(menuName = "AI/Aggressive")]
public class AggressiveStrategy : AIStrategy {
    public override Vector3 CalculateMove(GameObject enemy) {
        // Move toward player
    }
}

[CreateAssetMenu(menuName = "AI/Defensive")]
public class DefensiveStrategy : AIStrategy {
    public override Vector3 CalculateMove(GameObject enemy) {
        // Keep distance
    }
}
Real-World Example: Audio Manager
[CreateAssetMenu(menuName = "Audio/Audio Collection")]
public class AudioCollection : ScriptableObject {
    [System.Serializable]
    public class AudioEntry {
        public string name;
        public AudioClip clip;
        [Range(0f, 1f)] public float volume = 1f;
        public bool loop;
    }

    public List<AudioEntry> sounds;

    public AudioEntry GetSound(string soundName) {
        return sounds.Find(s => s.name == soundName);
    }
}
Testing & Debugging
Inspector Tools
[CreateAssetMenu(menuName = "Debug/Test Config")]
public class TestConfig : ScriptableObject {
    [Header("Debug Options")]
    public bool godMode;
    public bool showDebugInfo;
    public float timeScale = 1f;

    [Header("Test Values")]
    public int startingLevel = 1;
    public float testDamageMultiplier = 1f;

    #if UNITY_EDITOR
    [Button] // Requires custom attribute
    public void ResetToDefaults() {
        godMode = false;
        timeScale = 1f;
        // etc.
    }
    #endif
}
Integration with Unity Events
Connect ScriptableObject events to UnityEvents in Inspector!
Comparison with Other Patterns
Pattern | Best For | Drawbacks |
||-|–| | ScriptableObjects | Shared static data | Not for runtime state | | Singletons | Runtime managers | Tight coupling | | Static Classes | Utilities | Hard to test | | PlayerPrefs | Simple save data | Limited types | | JSON Files | Complex save data | More overhead |
Common Pitfalls
1. Modifying in Play Mode
Values changed during play mode persist in the editor!
Solution: Reset values in OnDisable() or use instance copies
2. Circular Dependencies
ScriptableObject A references B, B references A
Solution: Use events or dependency injection
3. Overuse
Not everything needs to be a ScriptableObject!
Solution: Use for data that’s truly shared/reusable
Use Case: Character Stats
Create a Character Stats System
- Define
CharacterStatsScriptableObject- Health, stamina, speed
- Armor, damage
- Special abilities list
- Create 3 character types:
- Warrior (high health, low speed)
- Rogue (high speed, low health)
- Mage (balanced, special abilities)
- Build a character selector that loads stats
Summary
Key Takeaways
✅ ScriptableObjects are data containers separate from GameObjects
✅ Perfect for shared configuration and asset-based design
✅ Enable data-driven development and designer-friendly workflows
✅ Great for memory efficiency and modularity
✅ Use for static data, not runtime state
✅ Powerful when combined with inheritance and events